(著)山たー
ペイントソフトとかでの塗りつぶしってどういうアルゴリズムなのかと思い、実装してみました。今はもっと洗練されたアルゴリズムを用いていると思いますが、今回はWikipediaに書いてあった一番簡単な方法を使ってみました。
Flood-fill アルゴリズム
Wikipediaに書いてあったのは以下のようなアルゴリズムです。
Flood-fill (node, target-color, replacement-color):
 1. If target-color is equal to replacement-color, return.
 2. If the color of node is not equal to target-color, return.
 3. Set the color of node to replacement-color.
 4. Perform Flood-fill (one step to the south of node, target-color, replacement-color).
    Perform Flood-fill (one step to the north of node, target-color, replacement-color).
    Perform Flood-fill (one step to the west of node, target-color, replacement-color).
    Perform Flood-fill (one step to the east of node, target-color, replacement-color).
 5. Return.
これを実装します。実用性を考えないので、アニメーションにしてみました。
実装
import numpy as np
import matplotlib.pyplot as plt
import matplotlib.animation as animation

arr = np.array([[1,1,1,1,1,1,1,1,1],
                [1,0,0,0,1,0,0,0,1],
                [1,0,0,0,1,0,0,0,1],
                [1,0,0,1,0,0,0,0,1],
                [1,1,1,0,0,0,1,1,1],
                [1,0,0,0,0,1,0,0,1],
                [1,0,0,0,1,0,0,0,1],
                [1,0,0,0,1,0,0,0,1],
                [1,1,1,1,1,1,1,1,1]])

fig = plt.figure(figsize=(3,3))

ims = [] # List to save frames

im = plt.imshow(arr, animated=True)
plt.clim(0,2) # 色の範囲を0~2に
ims.append([im])

def FloodFill(beginY, beginX, tcolor=0, rcolor=2):
    """
    tcolor :target-color
    rcolor :replacement-color
    """
    idxc = arr[beginY, beginX]
    if tcolor == rcolor:
        return
    else:
        if not idxc == tcolor:
            return
        else:
            if not idxc == rcolor:
                arr[beginY, beginX] = rcolor
                im = plt.imshow(arr, animated=True)
                ims.append([im])
            else:
                return

    if beginX + 1 < 9:
        FloodFill(beginY+1, beginX) # South
    if beginX - 1 >=0:
        FloodFill(beginY-1, beginX) # North
    if beginY + 1 < 9:
        FloodFill(beginY, beginX+1) # East
    if beginY - 1 >= 0:
        FloodFill(beginY, beginX-1) # West

FloodFill(4,4)

ani = animation.ArtistAnimation(fig, ims)
ani.save('FloodFill.mp4', writer="ffmpeg")
plt.show()
実装には再帰関数を用いています。アニメーションにすると、どういう順番で実行されているかがよく分かります。
OpenCVでFlood-fillを用いる
自分で実装しなくても、OpenCVには cv2.floodFill があります。
コード
import numpy as np
import matplotlib.pyplot as plt
import cv2
arr = np.array([[1,1,1,1,1,1,1,1,1],
[1,0,0,0,1,0,0,0,1],
[1,0,0,0,1,0,0,0,1],
[1,0,0,1,0,0,0,0,1],
[1,1,1,0,0,0,1,1,1],
[1,0,0,0,0,1,0,0,1],
[1,0,0,0,1,0,0,0,1],
[1,0,0,0,1,0,0,0,1],
[1,1,1,1,1,1,1,1,1]])
h, w = arr.shape
mask = np.zeros((h+2, w+2), np.uint8)
# Floodfill from point (4, 4)
# 配列の値を2に置換する
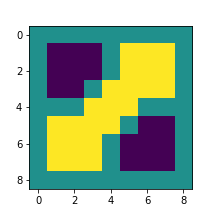
cv2.floodFill(arr, mask, (4,4), 2)
fig = plt.figure(figsize=(3,3))
plt.imshow(arr)
plt.savefig("result.png")
結果
参考にしたサイト
・python - Flood fill a shape in a binary image - Stack Overflow
・Filling holes in an image using OpenCV ( Python / C++ ) | Learn OpenCV
実はマスク画像の生成のためにflood fillについて調べていました。
コメントをお書きください